
Maintaining a bicycle’s tire is crucial for its smooth functioning, and a tire that slowly deflates can cause inconvenience and hinder bike performance, posing potential safety risks. However, fixing a slowly deflating bike tire can take only a few minutes with the following tips.
To begin with, the source of the leak needs to be identified. It’s worth noting that there are two types of punctures responsible for slow deflation: punctures caused by objects embedded in the tire and those caused by air leakage from an old valve or faulty patch job. Once the source of the problem has been pinpointed, appropriate action must be taken to fix it.
If the puncture is caused by an object, the first step is to remove the object and patch up any holes in both the tube and tire using a repair kit. Once the puncture is patched up, re-inflate the tire to the recommended pressure level. On the other hand, if the air leak is due to a worn-out valve or a faulty patch, replacing them with new ones is necessary before re-inflating the tube.
Table of Contents
1. Prepare The Bike
Proper preparation is crucial for successful bike tire repair. Before commencing any work, it is important to ensure that the bike is ready for repair, which can save time, money, and effort in the long run.
To prepare the bike for repair, the first step is to identify the type of tire that needs replacing. Most bikes have clincher tires, but tubular tires may be more suitable depending on the terrain and usage. This will also help determine what type of patch kit is needed. If a clincher tire is being replaced, it should be carefully removed from the rim to avoid any damage that could hinder an efficient repair.
After removing the tire, it is essential to check both the inside and outside of the tube for any existing punctures or holes that may have caused deflation. Furthermore, it is critical to inspect the inside of the wheel rim for any objects like glass shards or metal splinters that could have caused puncture damage.
2. Locate The Puncture
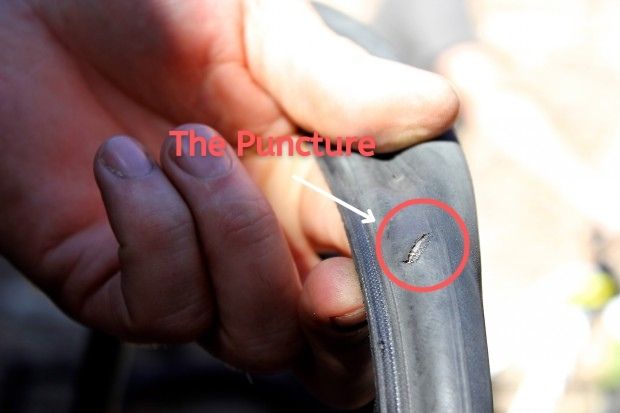
To fix a slowly deflating bike tire, it is essential to locate the puncture. The first step in locating the puncture is to examine the exterior of the tire for any visible objects that may have caused the puncture. If there is any protruding object, remove it before proceeding further.
Once the exterior has been examined, it is time to inspect the inside of the tire. An effective way to spot a puncture is by checking for air bubbles along the inner walls of the tube. Another useful technique is to lightly press different sections of both sides of the tire with your fingers and look for any weak spots that are releasing the air at a faster rate than other areas.
Using these techniques will help you identify and locate the puncture in your bike’s tire. Pinpointing the puncture accurately is vital to repairing it correctly and preventing future issues.
3. Remove The Tire
To fix a slowly deflating bike tire, it is essential to remove the tire from the wheel. This requires the use of a few simple tools. Firstly, use a tire lever(on Amazon) to remove the bead of the tire from the rim of the wheel. Secondly, use an adjustable wrench(on Amazon) to loosen and remove any bolts that may be holding the wheel in place.
Once the tools have been used, both sides of the inner tube can be taken out from within the tire. It is crucial to follow these tips for successful tire removal:
- Release all the air from the inner tube before attempting to remove it
- Gently pull out each side of the inner tube to avoid damage
- Use your fingers to locate any punctures or tears in the tube for proper repair
- Remove any debris or contaminants that could cause further damage while handling and repairing your bike tires.
After removing both sides of the inner tube, replace it with a new one and re-install your tire back onto your bike. Ensure that all bolts are securely tightened before taking your bike back on its next ride! With these simple steps, fixing a bike tire can be accomplished quickly and efficiently, allowing for safer cycling experiences.
4. Repair The Tire
Cyclists face a common challenge on the road, as nearly 45% have experienced a flat tire. However, repairing a slowly deflating bike tire can be done quickly and easily with the right tools and techniques.
To begin, it’s important to locate the puncture and identify its cause. Carefully examine both sides of the tire for cuts, abrasions, or any foreign objects embedded in the rubber. If necessary, use a bright flashlight to help detect the source of the leak. Once the puncture is identified, remove any debris and clean the area thoroughly.
The next step is to assess the condition of the tube and decide whether to patch it or replace it entirely. If there are only small holes, patching the tube with a rubber patch kit and vulcanizing glue may be possible. However, if the tube has a large tear or multiple punctures in one area, it’s best to replace it entirely with a new tube that matches the wheel size and tire type.
Finally, once all repairs are complete, it’s essential to inflate the tire properly and check for leaks periodically to ensure proper maintenance of your bicycle tires. By following these steps, you can ride safely again with minimal delays due to flat tires in the future.
5. Finish Up
Once the tire is properly inflated, the bicycle maintenance expert proceeds to reattach it to the wheel.
The first step is to check the tightness of the nut that holds the tire to the wheel. If necessary, the nut can be tightened with a wrench to ensure a secure fit.
Afterward, the wheel should be spun to check if it rotates freely without any wobbling. This will ensure that the tire is properly aligned and balanced on the wheel.
Finally, any remaining air in the tire should be released using an inflator or other suitable device. The tire pressure should then be checked one last time before putting everything back together and ensuring that all nuts and bolts are tight.
A properly inflated and reattached tire will provide a smooth and safe ride for miles to come.
To Sum Up
Biking is a wonderful way to get around, reduce emissions, and stay fit. However, the last thing you want is to have your tire suddenly deflate. With the right knowledge and equipment, you can quickly and easily fix it. The following steps provide an easy-to-follow guide for repairing a slowly deflating bike tire in minutes. By following these steps, you can get back on your bike and enjoy the ride without worrying about a flat tire.
The process of fixing a deflated bike tire can be viewed as a metaphor for taking control of one’s life. Locating the puncture is crucial in finding the root cause of the problem while removing and replacing the tire signifies putting in the necessary effort to make progress. Lastly, completing the repair process requires trusting that all efforts have been put in place to ensure success.
In this way, fixing a slowly deflating bike tire is more than just a practical task; it’s also an opportunity to develop self-management skills. With patience and perseverance, even a slow leak can be fixed in just a few minutes!
Related Q&A

Q1: What are the signs that my bike tire is slowly deflating?
A: Signs of slowly deflating bike tires include a mushy or spongy feeling when riding, reduced tire pressure, and decreased performance.
Q2: What should I do first to fix a slowly deflating bike tire?
A: The first step is to identify the location of the leak by submerging the tire in water or using a soapy solution to identify bubbles.
Q3: How do I patch a bike tire with a slow leak?
A: To patch a slow-leaking bike tire, remove the tire from the rim, rough up the area around the puncture, apply rubber cement, and attach a patch.
Q4: Can I use a patch kit to fix a slow leak in a bike tire?
A: Yes, a patch kit can be used to fix a slow leak in a bike tire by applying a patch over the puncture.
Q5: What if the bike tire’s valve is the cause of the slow leak?
A: If the valve is the cause of the slow leak, try tightening the valve core or replacing the valve entirely.
Q6: How do I inflate a bike tire after fixing a slow leak?
A: Use a tire pump or an air compressor to inflate the tire to the recommended pressure level, which is usually listed on the sidewall of the tire.
Q7: How often should I check my bike tire pressure?
A: It’s recommended to check tire pressure before each ride or at least once a week.
Q8: What should I do if my bike tire keeps losing air?
A: If the bike tire keeps losing air, inspect the tire for any cuts or punctures, and make sure the valve is tightly secured.
Q9: How can I prevent slow leaks in my bike tires?
A: To prevent slow leaks, avoid riding over sharp objects, regularly check tire pressure, and replace worn or damaged tires.
Q10: When should I replace my bike tire instead of repairing it?
A: It’s recommended to replace a bike tire if it’s worn or damaged beyond repair, has multiple punctures, or if the tire is too old and has reached the end of its lifespan.