

Enjoy smooth, rapid bike shifting? The rear derailleur, a key part of your bike’s transmission, occasionally needs adjustment. Fortunately, practice makes it easy. Just a twist of the screwdriver does the job. Follow these tips for precision adjustments, akin to a Swiss clock.
Table of Contents
- 1. Adjusting the bicycle derailleur on a workshop stand
- 2. How do I adjust the rear derailleur bearings?
- 3. How to tension a derailleur cable?
- 4. The important gearshift test for proper tuning
- 5. Position yourself on the middle tray
- 6. Problem: Gear shifting lacks precision?
- 7. Lubricated cable and sheath
- Related Q&A
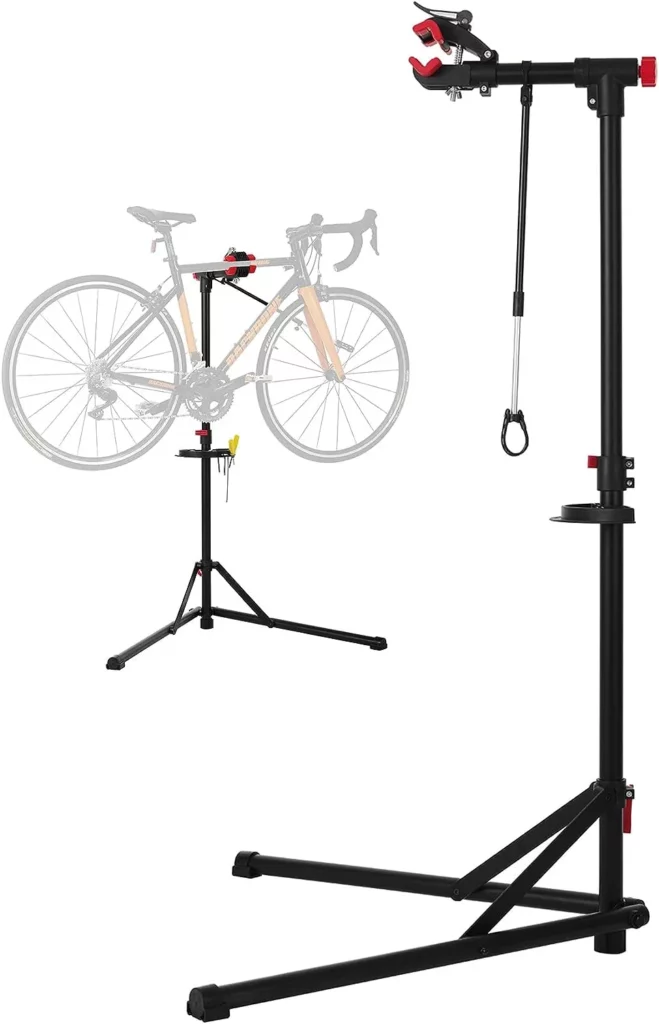
1. Adjusting the bicycle derailleur on a workshop stand
For the best results, place your bike on a stand when adjusting the rear derailleur. This allows you to pedal by hand and test gear shifts progressively, ensuring you reach the ideal configuration.
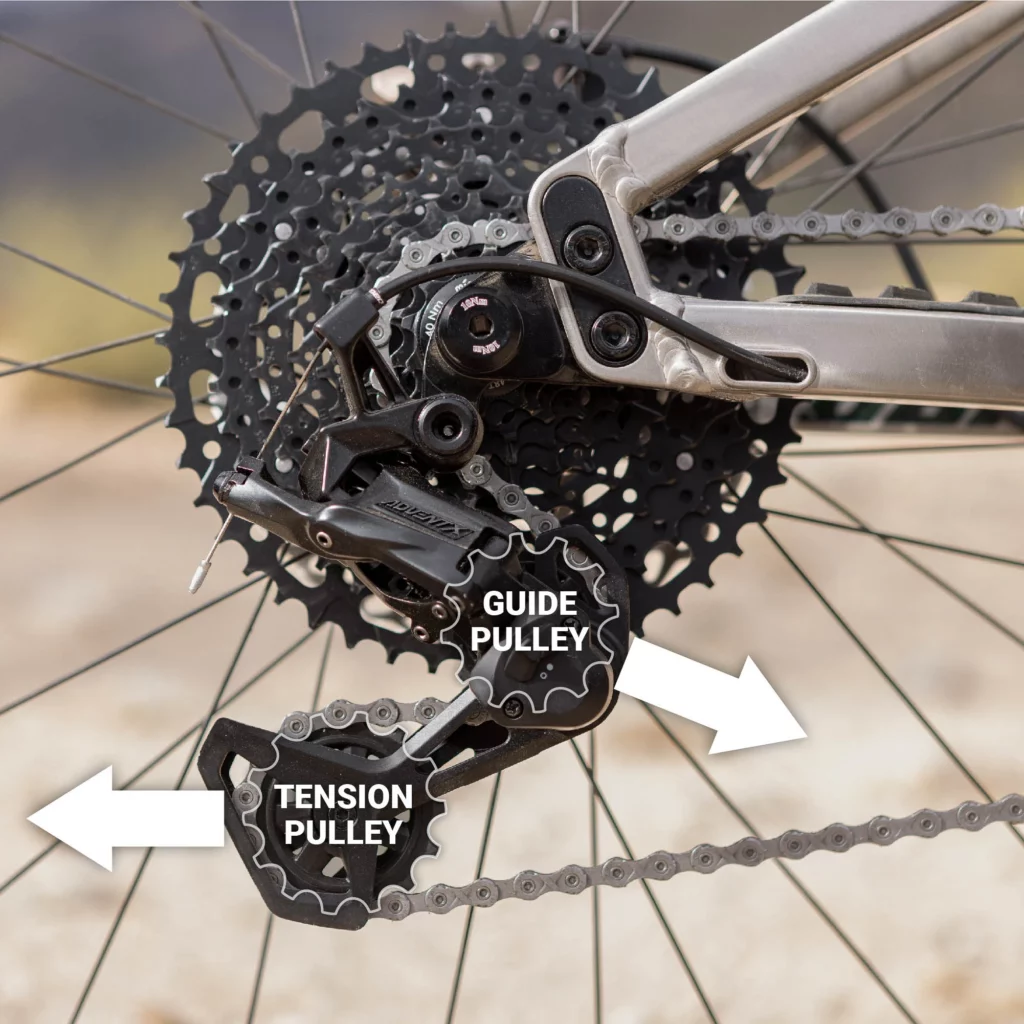
2. How do I adjust the rear derailleur bearings?
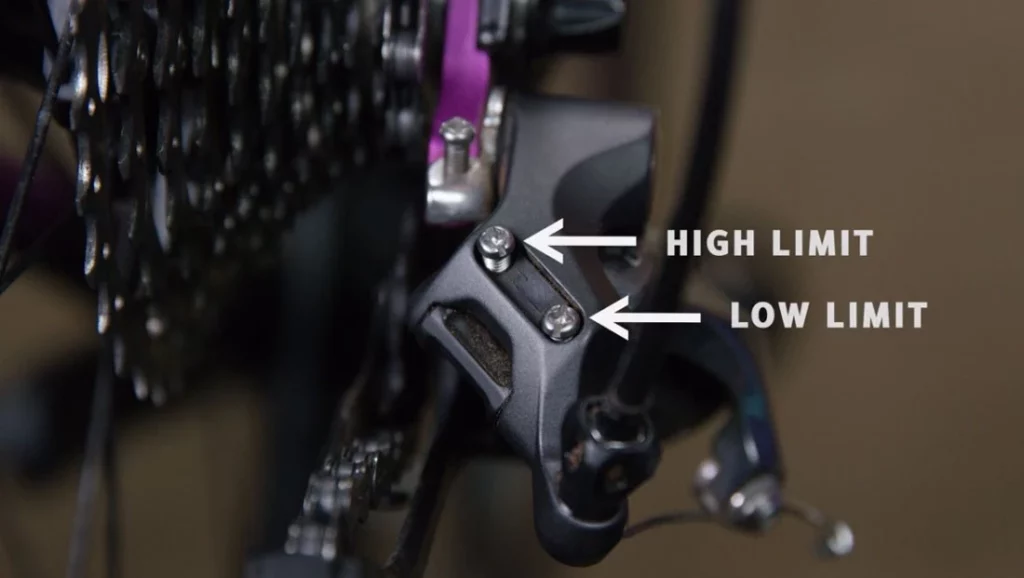
To begin with, the first aspect to address when adjusting your rear derailleur is the chain stops. It’s essential to note that these stops determine the derailleur’s movement from the small to the large sprocket, preventing any chain mishaps. You’ll know they’re correctly set when the derailleur moves up and down smoothly, avoiding derailment, and there’s no rattling on the smallest and largest cogs.
Now, let’s focus on making adjustments:
Small-Pinion Side Stop (High or Low Stop): To get this right, align the chain and guide pulley precisely with the small pinion.
Large-Sprocket Side Stop (Low Stop): For this adjustment, ensure that the chain and guide roller are in perfect alignment with the large sprocket.
Remember :
- unscrew to move the stop towards the outside of the frame
- screw to move the stop towards the center of the wheel
Good to know: You can manually adjust the stops without needing a cable. If your derailleur doesn’t reach the large-pinion side stop, check the cable’s tension. Loosen the cable clamp screw and test the adjustment manually.
3. How to tension a derailleur cable?
Before adjusting cable tension, start by loosening the cable and positioning the adjustment knob at the halfway point. This initial step proves invaluable for future tension adjustments.
- Place your chain on the small sprocket and the second chainring.
- Tightly pull the derailleur cable by hand and then adjust the clamping screw.
- Conduct a shifting test.
- Fine-tune the tension using the knob until you achieve the desired setting.
When gears encounter difficulty shifting upwards, increase tension using the knob. Conversely, when gears resist shifting downwards, reduce tension with the knob. This adjustment should be a gradual process as you test shifting and make cable tension adjustments.
4. The important gearshift test for proper tuning
The shift test holds significant importance in rear derailleur setup. It should accurately mirror real gear usage.
To conduct a proper gear test, follow these steps:
- Shift gears sequentially, from small to large and vice versa.
- Experiment with both downshifting and upshifting.
- Assess shifting across all chainrings.
When performing gear shifts on a workshop stand, merely pedal with one hand while shifting with the other.
5. Position yourself on the middle tray
o begin, if your bike has three chainrings, start by using the middle one. Then, assess the rear derailleur’s adjustment. After that, test the shifting with the remaining chainrings.
6. Problem: Gear shifting lacks precision?
Inspect the pulleys and derailleur hanger for potential issues. Your rear derailleur’s shifting precision might be compromised, with issues such as gears skipping, failing to engage, or producing rattling sounds. These issues may be attributed to two factors:
Firstly, consider the condition of the derailleur pulleys. If they exhibit lateral play, it could lead to imprecise shifting. Replacing these pulleys is an option to rectify this problem.
Secondly, evaluate the state of the derailleur hanger. A bent hanger can cause misalignment between the derailleur and sprocket, resulting in decreased precision. If damage is present, you should either straighten or replace the hanger as needed.
7. Lubricated cable and sheath
Ensuring a smooth gear shift requires proper lubrication of the rear derailleur cable and housing. It’s these small steps that truly matter. A touch of lubricant can work wonders.
You might like also to read: How to Fix a Slowly Deflating Bike Tire?
Related Q&A

Q1: What is the purpose of adjusting a bicycle rear derailleur, and why is it important for riders?
To optimize gear shifting for a smoother ride.
Q2: What are the initial steps for adjusting a bicycle rear derailleur?
Start by shifting to the smallest chainring and the largest rear cog.
Q3: Why should cyclists use transition words like “first,” “next,” and “then” when adjusting their rear derailleur?
Transition words help to sequence steps and make the process easier to follow.
Q4: What tool is typically needed for rear derailleur adjustments?
A screwdriver or Allen wrench is commonly used to make precise adjustments.
Q5: How can cyclists ensure their rear derailleur hanger alignment is correct?
Use a derailleur hanger alignment tool for accurate positioning.
Q6: What role do limit screws play in rear derailleur adjustments?
Limit screws control the range of movement and prevent the chain from falling off.
Q7: Why is cable tension crucial when adjusting a rear derailleur?
Proper cable tension ensures crisp and reliable shifting.
Q8: What steps should be taken to fine-tune the indexing of a rear derailleur?
Make small adjustments to the barrel adjuster until the shifting is precise.
Q9: How can riders test the adjustments made to their rear derailleur?
Ride the bike, shifting through all gears to confirm smooth transitions.
Q10: Why is it essential to follow manufacturer-specific guidelines when adjusting a bicycle rear derailleur?
Manufacturer guidelines ensure optimal performance and prevent damage to the derailleur or drivetrain.