

Cycling is a great way to stay active and healthy, and a bicycle computer can help you track your progress and make the most of your rides. With a bicycle computer, you can easily monitor your speed, distance, and calorie burn. So how to install bicycle computer and GPS?
However, before you can start using your new computer, you’ll need to install it on your bike. Don’t worry, it’s not difficult! In this guide, we’ll walk you through the process step by step, with plenty of pictures to help you along the way.
Active cyclists know that feedback is key to staying motivated. A bike computer provides you with instant feedback on your speed, distance, and elevation gain. This information helps you to set new goals and discover new routes.
Additionally, many bike computers come with GPS capabilities, allowing you to track your location and explore new routes. So, if you’re ready to take your cycling to the next level, let’s get started on installing your new bike computer and GPS.
You’ll need the following tools:
- Screwdriver or Allen keys;
- To trim tie wraps, use cable cutters or scissors.
Setting up a cycle computer
First step:
Installing a magnet on your bike is an important step in setting up your bike computer. The magnet should be placed on a spoke, closer to the hub than the rim. This is because the hub spins slower than the rim, giving the sensor more time to detect it.
When attaching the magnet, be sure to follow the manufacturer’s instructions. Magnets come in different forms, such as two parts that fit around a spoke or a single piece that clips on.
If you have a two-part magnet, open it and place one half on one side of the spoke. Then, attach the other half to keep it in place. This will ensure that the magnet stays securely attached to your bike while you ride.
Second Step:
Next, you’ll want to attach the sensor to your bike. The sensor is typically secured to the fork using tie-wraps. Carefully follow the instructions that come with your sensor and make sure that the correct side of the sensor is facing the spokes.
Once the sensor is in place, you’ll need to align it with the magnet. The sensor should be placed over the magnet. Many sensors have a light indicator that will flash when it detects the magnet. After several passes of the wheel near the sensor, adjust the sensor’s position until the light starts flashing.
This will ensure that the sensor and magnet are communicating properly, and your bike computer will be able to accurately track your ride data.
Third Step:
You’ll need to attach the computer mount to your handlebar. This mount is typically held in place using tie-wraps, but some models may require a clamp and bolt. Make sure that the mount is securely attached to your handlebar.
If your computer has a wire connecting the sensor and mount, you’ll need to route it properly. First, tie-wrap the wire to your fork. Then, wrap it around the front-brake cable-outer until it reaches the level of your handlebar. Make sure there is enough slack in the wire so that it won’t get caught on anything while you’re riding.
Fourth Step:
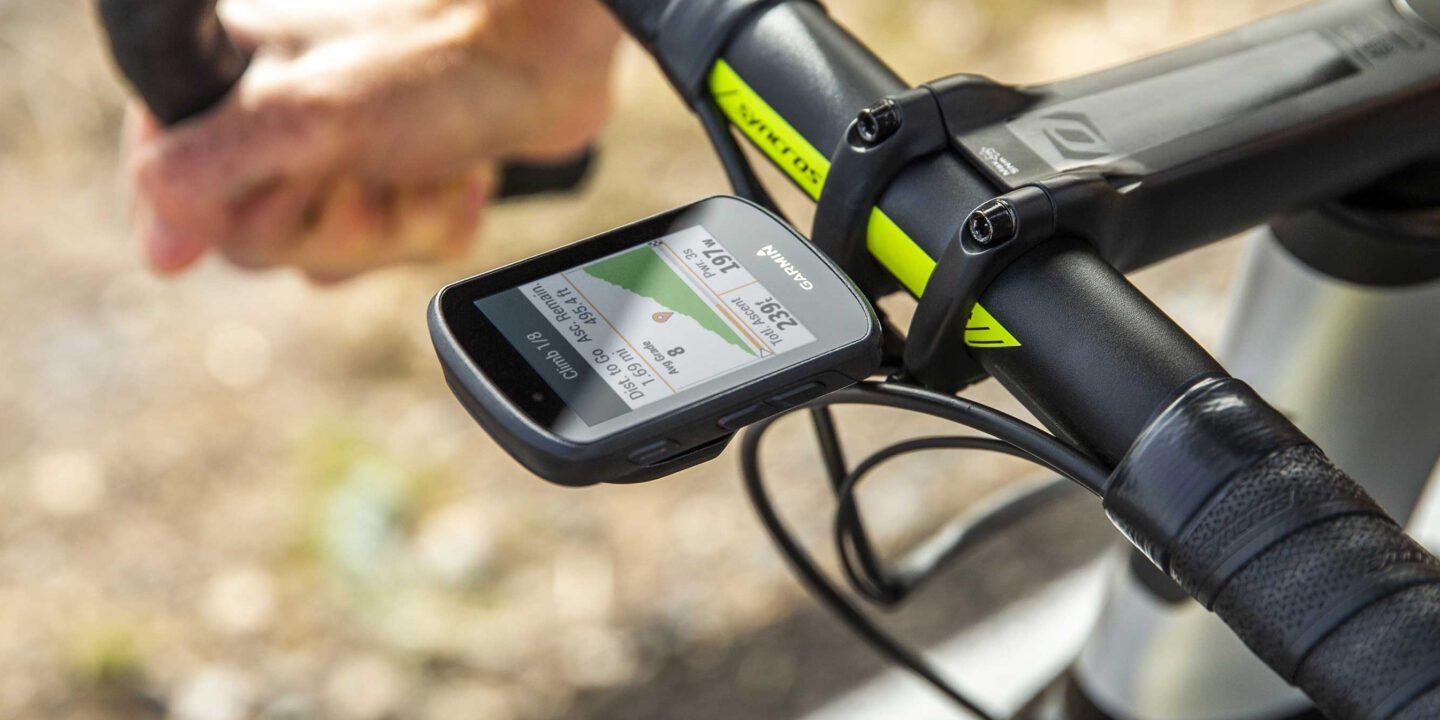
With the sensor and magnet properly installed and aligned, it’s time to mount the computer on your handlebar. Follow the manufacturer’s instructions to properly attach the mount to your bike. Once the mount is securely in place, you can proceed to program your computer as directed.
Before you hit the road, it’s a good idea to double-check that the computer’s heart-rate function is working properly. If it isn’t, you may need to reposition the computer on your bike’s stem to bring it within range of the sensor, which is worn on a chest strap. This will ensure that the computer can accurately track your heart rate while you ride.
With everything set up, it’s time to hit the road and start tracking your rides with your new bike computer. Happy cycling!
View some bike computers on Amazon
Installing bike GPS tracking device
First Step:
Before you proceed with attaching the computer mount, it’s important to attach any ancillary equipment first. For example, if your GPS comes with a pedal-cadence sensor, you’ll need to add a magnet to the left-hand crank and tie the sensor to the left-hand chainstay. Make sure to follow the manufacturer’s instructions when doing so.
It’s crucial to double-check that the sensor and magnet of any ancillary equipment are properly aligned. This will ensure that the computer can accurately track the data from the ancillary equipment. Once you have confirmed that all ancillary equipment is working correctly, you can proceed to attach the computer mount to your handlebar and program the computer as directed.
Second Step:
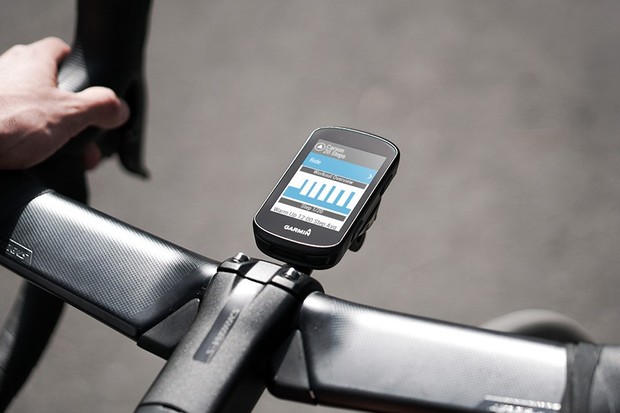
To complete the installation of your GPS, you’ll need to attach the GPS mount to your bike. This mount can be attached to either the handlebars or the stem.
This mount is a single-point mount with an elastic loop rather than bolted clamps, which makes it easy to install.
Before attaching the GPS to the mount, you’ll need to set it up according to the manufacturer’s instructions or the messages displayed on the screen when you turn it on. Once the setup is complete, attach the GPS to the mount using the clip provided. Make sure that the GPS is securely attached to the mount before you start your ride.
By following these steps, you’ll have a properly installed GPS that will help you navigate and track your rides. Happy cycling!
Conclusion
Installing a GPS and Cycle Computer can be a great way to enhance your cycling experience. These devices can help you track your distance, time, and elevation gains, which can be a great source of motivation and information for cyclists of all levels.
The process of installing these devices can seem daunting, but our blog post has provided you with step-by-step instructions and helpful images to make the installation process as simple as possible.
By following these guidelines, you’ll be able to enjoy all the benefits of having a bicycle computer and GPS on your bike. If you have any questions or need further clarification on any step of the installation process, please feel free to ask in the comments section. We’ll do our best to provide you with an answer as soon as possible.
Read also: List of The Best Cycling Shoes Under $100


4 replies on “How to Install Bicycle Computer and GPS”
[…] Read Also: How to Install Bicycle Computer and GPS […]
[…] Read Also: How to Install Bicycle Computer and GPS […]
[…] Read Also: How to Install Bicycle Computer and GPS […]
[…] READ ALSO How to Install Bicycle Computer and GPS […]